Impaktor User Manual
Before you start
Understanding the concept
Impaktor is an innovative drum and percussion instrument app which uses your device's microphone to control its sound engine. This means it lets you create many kinds of rhythms simply by tapping your table or producing any other rhythmical noises - Impaktor analyzes the spectrum and dynamics of the sound and applies them onto its powerful synthesis models. It's a unique musical tool which is incredibly fun and entertaining to play with, and this manual will help you open up its full potential.
Getting ready to play
Since Impaktor is fully driven by incoming audio, for the very best possible experience you should work with it in an isolated environment, such as a silent room. It is also recommended to use headphones instead of the device's built-in speaker in order for the generated sound to stand out better, as well as to avoid creating a feedback loop and unwanted sound re-triggering.
Please also keep in mind the location of the microphone on your device:
-
iPad: on the top edge (if you hold it in portrait mode home button down).
-
iPhone: on the bottom edge.
-
iPod touch: on the back near the rear camera (from fourth generation only).
We also advise not to use microphone-equipped headsets since the microphone will be too far from the surface your device will be placed on and thus will compromise the dynamics of the Impaktor's sound.
User interface
On iPhone and iPod touch, Impaktor's interface is split into two views: one with sound editor, another with preset, track and recorder controls. You can switch between these views with the two leftmost buttons in the mode and utility panel.
Track and preset controls
To adjust a control represented as a knob, tap and hold it, and then drag your finger up to rotate it clockwise, or down to rotate it counter-clockwise. A double-tap on a knob resets it to the default setting.
Utility panel
Switch to track & recorder view.
Switch to sound edit view.
Access the sessions manager to load/save the whole status Impaktor: six tracks and effects.
Access the settings panel.
Bounce sequence or record live performance into an audio file.
Microphone input on/off switch.
Settings
Input sensitivity
Adjusts the sensitivity level of the transient detector.
High-cut filter
When on, helps prevent unwanted sound triggering by faint sounds such as scratches, moving headphone wire, etc.
Disable reverb
Reduces Impaktor's processor resource consumption.
Only full beats
When on, metronome will only sound on full beats, and per selected sequencer resolution otherwise.
Volume
Adjusts the loudness of the metronome tick.
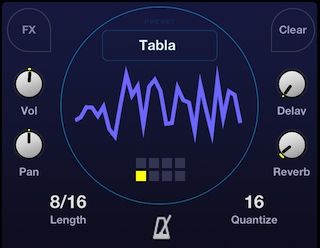
Playing with presets
The best way to start exploring Impaktor is to go through the collection of sounds included in the factory presets. The app ships with a wide variety of different drum, percussion, melodic and effect sounds which will help you get started.
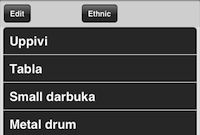
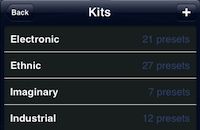
Step 1. Tap on the preset name to launch the preset browser.
Step 2. In the popup browser, tap any preset to load it, or tap on the bank button.
Step 3. If you wish, choose a different bank, and then tap a preset name from the list to load it.
Once you pick a preset to play with, it's time to give Impaktor a kick - literally. Here is a few ways you can do it. Put your device sturdily on a table or a desk, and start tapping your hands on its surface. Just treat it like you would a drum's membrane. Get the feel of the Impaktor's response by tapping with a varying force and using different parts of your hand - palm hit, single finger slap, multiple finger slap, finger roll, nail roll, and so forth.
Recording & exporting
Configuring the six tracks
Impaktor lets you configure and switch between up to six different "tracks", each assigned with its own sound.
The currently active track is highlighted with a yellow outline. A light blue background indicates when a track has a recording in it, it is dark blue when it's empty. To solo a track, tap and hold it, then slide your finger up. To mute or un-mute a track, slide your finger down.
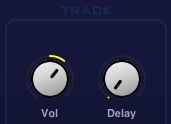
Each track has its own individual controls for level and pan, plus delay and reverb sends.
Applying effects
Tap the "FX" button to open up the settings panel for the delay and reverb effects.
Feedback
Feedback amount for the delay effect: one repeat (minimum), many repeats (maximum).
L-taps
Delay time for the left channel tap.
R-taps
Delay time for the right channel tap.
Cross
Amount of cross-feed between left and right channels.
Pre
Reberberation pre-delay time.
Size
Size of the reverberation chamber.
L-cut
Low-frequency cutoff.
H-cut
High-frequency cutoff.
H-damp
Amount of high-frequency cutoff.
Timing & quantize
Before you start recording your live playback, you should check and adjust the sequencer timing.
Sequencer tempo in beats per minute.
Metronome tick on/off switch.
Recording a sequence
While you're recording a sequence, you can switch tracks and overdub them as many times as you wish. You can also tap the record button during recording and enter the "rehearsal" mode - so you can switch to another track, try it out, and then get back to recording when you're ready.
Use the "clear" function to erase the current track or all tracks at once.
Exporting an audio file
Impaktor allows you to export your sequence as an audio file, and also make a longer real-time recording of any peformance which is useful if you wish to improvise or tweak the sound engine's parameters. All files you record are available for copying and pasting into other apps, as well as accessing via iTunes file sharing.
Make sure your recorded sequence or live performance doesn't send the output level meter into the red zone. If needed, adjust the master level accordingly.
Tap this button to access the export dialog.
Renders the currently recorded sequence into an audio file.
Starts live recording of anything you play with Impaktor.
Creating your own sounds
How to start from scratch
Impaktor comes with many handy presets which you can quickly modify to your taste. But if you wish to create an entirely new sound from a clean sheet, it's only a one-tap operation.
Press this button to initialize the sound to default settings.
Sound engine structure
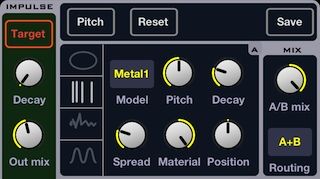
Imakton's sound generation starts with the "impulse" section which detects the transients in the input audio signal. This is fed into two modules A and B each of which has one of four different sound generators including membrane, resonator, noise + vocoder and FM synthesizer. These two generators are then mixed and fed into a multi-mode filter, followed by an output amplifier. An envelope generator, together with the impulse section, can be used to modulate most of the sound engine's parameters according to the input sound's dynamics.
Input impulse
Decay
Decay time of the transient detector.
Out mix
Blends in the dry input signal.
Freq
Emphasizes a certain frequency band of the input signal.
Boost
Emphasis level of the adjusted frequency band.
The impulse section can be used as a modulation source. To assign it to one or more parameters, follow these instructuions:
Step 1. Tap the orange "Target" button.
Step 2. Rotate the desired parameter's knob clockwise to adjust the normal modulation depth or counter-clockwise for inverted modulation depth.
Model 1: membrane
Simulates a vibrating membrane attached to a hollow body.
Model
Selects the membrane type.
Base
Decay time of the base frequency partial.
Pitch
Overall pitch of the membrane.
Material
Frequency partial damping time, low frequencies (minimum) to high frequencies (maximum).
Decay
Overall decay time of the membrane sound.
Position
Frequency partial level balance, low frequencies (minimum) to high frequencies (maximum).
Model 2: resonator
This model simulates a resonator, such as a metallic plate, rectangle or triangle.
Model
Selects the resonator type.
Spread
Distance between frequency components.
Pitch
Overall pitch of the resonator.
Material
Frequency partial damping time, low frequencies (minimum) to high frequencies (maximum).
Decay
Overall decay time of the membrane sound.
Position
Frequency partial level balance, low frequencies (minimum) to high frequencies (maximum).
Model 3: noise & vocoder
A vocoder which uses a noise generator as a carrier signal and input impulse as a modulator signal.
Spread
Distance between vocoder filterbank frequencies.
Reso
Resonance of the vocoder filterbank.
Pitch
Overall frequency position of the vocoder filterbank.
Material
Frequency partial damping time, low frequencies (minimum) to high frequencies (maximum).
Decay
Overall decay time of the vocoder sound.
Position
Frequency partial level balance, low frequencies (minimum) to high frequencies (maximum).
Model 4: FM synthesizer
Two-operator frequency modulation synthesizer.
Osc 1
Waveform type for Oscillator 1.
Osc 2
Waveform type for Oscillator 2.
Pitch
Overall pitch of the FM synthesizer sound.
Ratio
Frequency ratio between oscillators 1 and 2.
Decay
Overall decay time of the FM synthesizer sound.
Amount
Modulation depth of oscillator 1 by oscillator 2.
Scale
When the impulse section or the envelope generator is assigned to the pitch parameter of one or both of the modules, the scale feature can be used to restrain the pitch only to frequencies corresponding to certain keys. This allows to create "reactive" melodic progressions.
Choose two or more keys and pitch will always fall into one of them depending on the input signal dynamics.
Mix
A/B mix
Balance between sound generator modules A and B.
Routing
Defines whether modules are mixed (A+B), or module A is fed as an input into module B.
Filter
Type
Filter type (low-pass, high-pass, band-pass, notch, etc.).
Slope
Frequency response slope.
Target
Defines whether the filter is applied onto both modules, module A or B individually, or onto the transient envelope.
Envelope
Curve
Envelope sensitivity curve.
Amp
Envelope global modulation level.
Decay
Envelope decay time.
The envelope section is meant to be used as a modulation source. To assign it to one or more parameters, follow these instructuions:
Step 1. Tap the green "Target" button.
Step 2. Rotate the desired parameter's knob clockwise to adjust the normal modulation depth or counter-clockwise for inverted modulation depth.
Amplifier
Drive
Saturation/distortion intensity.
Type
Saturation/distortion type.
Amp
Final level of the sound engine.
How to save your sound
Once you're happy with the sound you've created, you can save it using the following procedure.
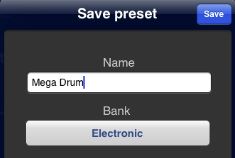
Step 1. Tap the "Save" button.
Step 2. Type in a name for your preset, and tap "Save". If you wish, you can choose a different bank to save your preset to, and in the bank list you create a new one by tapping the "+".